SG90 Servo Motor: Understanding Operation & Position Control Using Arduino

The SG90 servo motor is an actuator capable of producing rotary motion from 0° to 180°. Its range is limited because a mechanical obstacle is attached to the final gear, which prevents the output shaft from making a complete rotation. This servo motor is ideal for precisely controlling the direction of RC cars, planes, or boats, as well as constructing a robotic arm or spider robot.
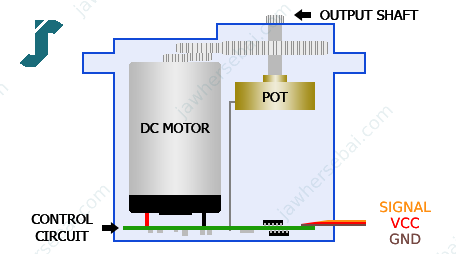
Internal Components
Within the SG90, there’s a small DC motor, plastic gears for torque amplification, a potentiometer to determine the current position of the output shaft, and a control circuit housed at the base.
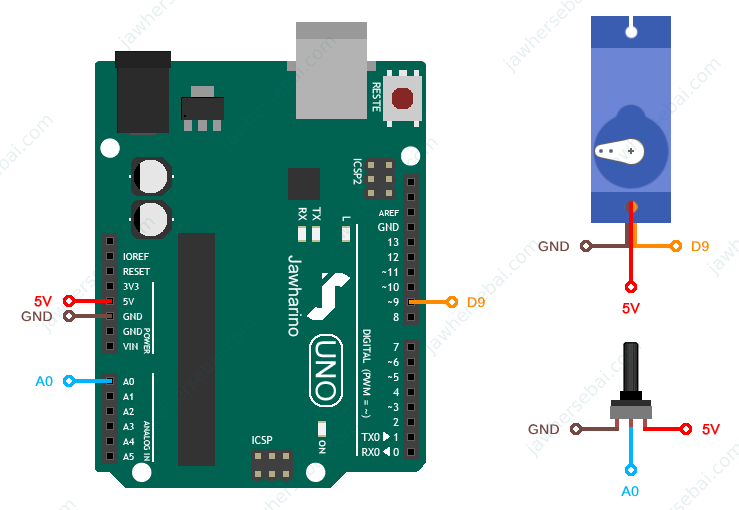
Three wires are coming out of the SG90: the red wire is for powering it with 5V, the brown wire is for the ground (GND), and the orange wire is for controlling the servo’s position using a PWM signal.
Working Principle
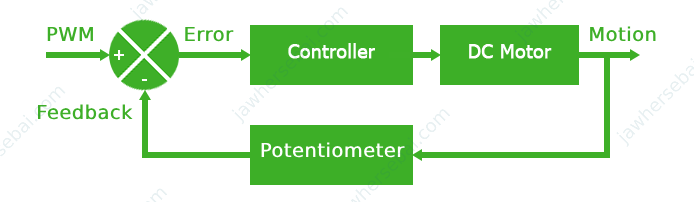
The SG90 servo motor works in a closed-loop system, utilizing the potentiometer as a feedback mechanism to attain the target position of its output shaft.
The control circuit features a comparator that compares the input PWM signal with the position feedback signal from the potentiometer to generate an error signal. This error signal is then processed by a controller, which in turn drives the DC motor through an H-bridge.
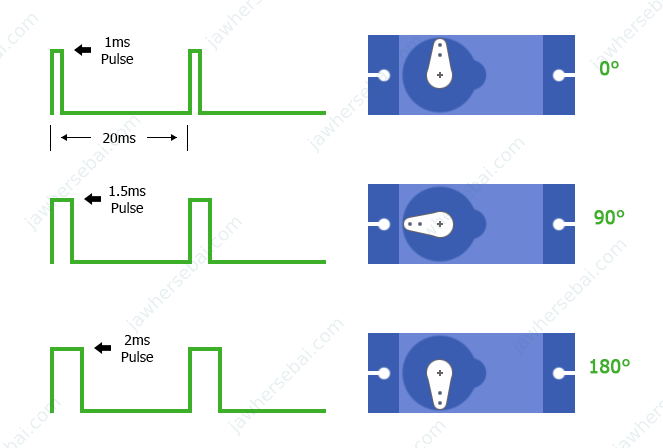
The controller is programmed such that a 1 ms pulse width positions the output shaft at 0°, a 1.5 ms pulse width positions it at 90°, and a 2 ms pulse width positions it at 180°.
Controlling the Position of the SG90 Using Arduino
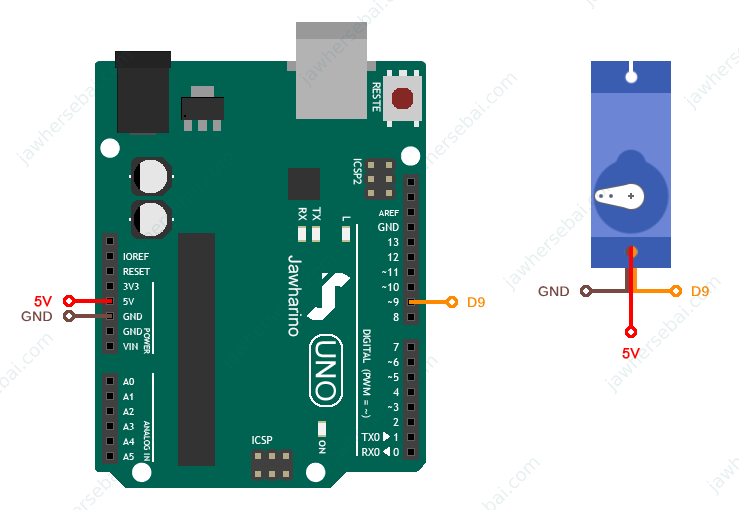
Once you finish the connections as shown above, connect the Arduino board to your computer and open the Arduino IDE. Then, upload the sketch below, which positions the servo arm at 90°.
int servoPin = 9; // declare and initialize a variable to hold the number of the pin the servo is attached to
void setup() {
  pinMode(servoPin, OUTPUT); // sets the variable as output
}
void loop() {
  digitalWrite(servoPin, HIGH);    // sets the servo pin on
  delayMicroseconds(1465);         // pauses for 1465 microseconds
  digitalWrite(servoPin, LOW);     // sets the servo pin off
  delayMicroseconds(1465 - 20000); // pauses for 18535 microseconds
}
I generated pulses of 1 ms, 1.5 ms, and 2 ms in width using the Arduino function delayMicroseconds(), but the servo arm did not seem to move to the correct positions. I believe that manufacturers preprogram their servos differently, as I discovered that a 0.550 ms pulse width sets my servo’s output shaft to 0°, a 1.465 ms pulse width to 90°, and a 2.380 ms pulse width to 180°.
With a Library
Using a library can minimize the amount of code you need to write. To install the servo library, go to Sketch > Include Library > Manage Library. Then, in the search bar, type “servo” and install the one by Michael Margolis. Now you only need to include the library in the sketch, create a servo object, in void setup indicate the PIN the servo is attached to (it should be a PWM pin), and in void loop send the servo arm to the desired position.
#include <Servo.h>
Servo jawharino;// I chose "jawharino" as a name
void setup() {
  jawharino.attach(9);// here I chose PIN 9
}
void loop() {
  jawharino.write(90);// here I will send the servo arm to the 90° position
}
The Servo library includes two example sketches: ‘Knob’ and ‘Sweep’. You can find them in the Arduino IDE by navigating to File > Examples > Servo.
The ‘Sweep’ sketch oscillates the servo arm between 0° and 180°, while the ‘Knob’ sketch allows you to control the position of the servo arm with a potentiometer.
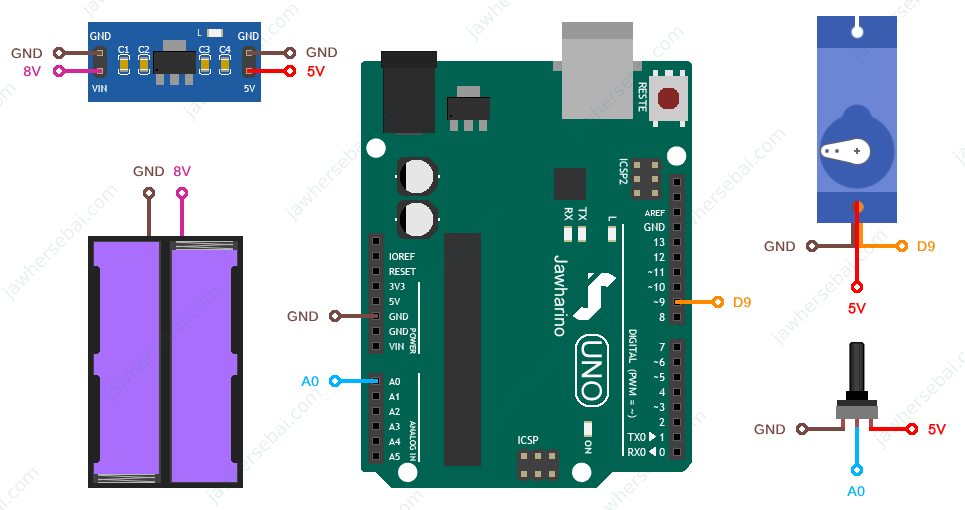
According to what I found online, the stall current, which is the maximum current the SG90 servo motor will consume, is 650 mA. Therefore, testing the full performance of the servo motor while it is being powered by the 5V pin of the Arduino UNO might fail, as this pin is limited to 500 mA when the board is powered via USB cable. Instead, it is preferable to use an external power supply.
Upon testing the servo, I found that the SG90 servo motor can lift a maximum weight of 700 grams when powered with 5V, provided that the weight is positioned 1 cm away from the rotation center.
Check out this short video on YouTube.
Sources
- SG90 Datasheet: friendlywire.com
- Servomotor: Wikipedia
- Powering Alternatives for Arduino Boards: Arduino Documentation