HY-SRF05 Distance Sensor: Understanding Operation & Using It with Arduino
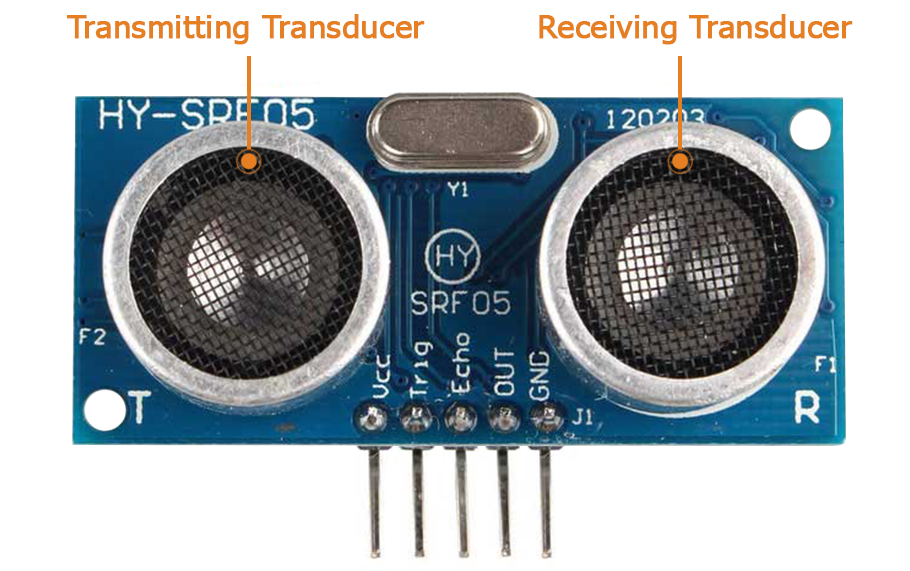
Welcome to this tutorial on how to use the HY-SRF05 distance sensor with Arduino! In this guide, we’ll learn how to integrate and program a distance sensor to measure distances accurately. If you’re working on a robotics project that requires an obstacle detection system, then this tutorial got you covered.
Pinout
- Vcc and GND are for powering up the sensor with 5V.
- The Trig pin is for sending the ultrasonic sound waves.
- The Echo pin will give us the time it takes for ultrasound waves to travel out and back to the sensor.
- The OUT pin will produce electrical pulses corresponding to the ultrasonic waves that have been emitted.
How Does It Operate
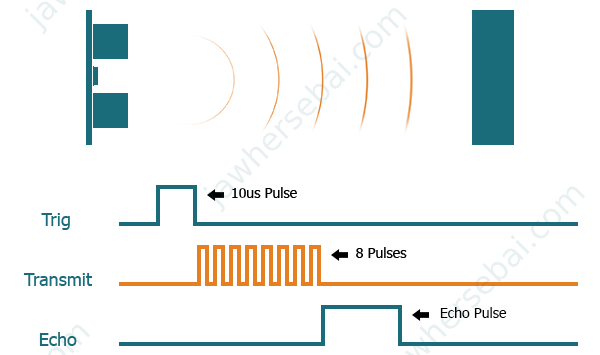
To use the ultrasonic distance sensor with an Arduino board, you must first send a signal to the sensor to initiate operation, which involves applying a 5V pulse to the Trig pin for a duration of 10 us. Following this, the sensor emits 8 ultrasonic pulses at 40 kHz using the transmitting transducer and then sets the echo pin to a high level.
If the sound waves return to the sensor, the receiving transducer will pick them up, causing the Echo pin to drop to a low level, which finally produces a pulse with a duration equal to the time it takes for the sound waves to exit the sensor and return to it.
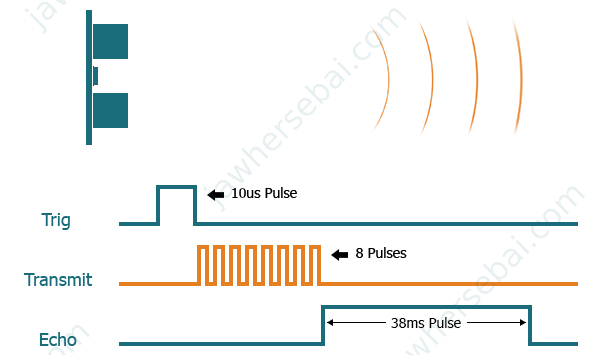
If no object is present within the sensor’s detection range (2 cm to approximately 4.5 m), the Echo pin will return by itself to the low level after a duration of 38 ms, and that pulse will indicate that there is no object in front of the sensor.
Example
- Echo pin = 280 us.
The number must be divided by two because the pulse duration represents the time it takes for the waves to travel from the sensor to the object and back again to the sensor. - The speed of the sound in dry air at 20°C = 343 m/s = 0.0343 cm/us.
- The formula is D = T * S, with D = distance, T = time, and S = speed.
D = 0.0343 * 140 = 4.8 cm

Measuring Distance with the HY-SRF05 and Arduino
Two Wire Connection
Without a Library
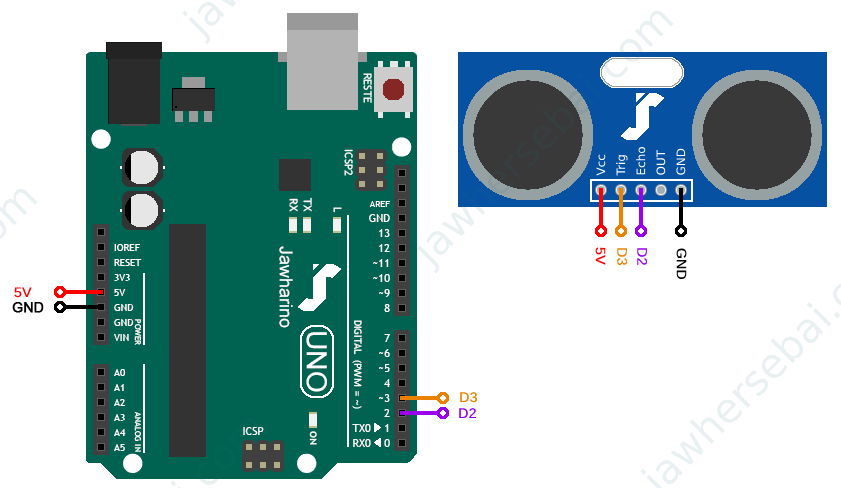
First, we’ll write the sketch as instructed, and then we will use the library “NewPing” to help us write with fewer instructions.
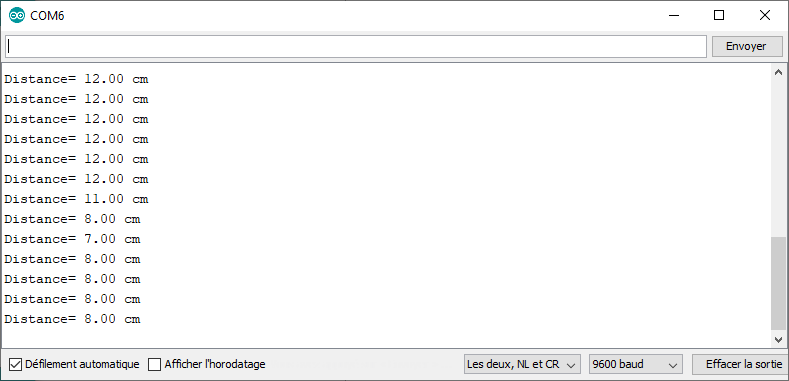
After completing the connections as shown above, copy and paste the next sketch to your Arduino IDE, click upload, and once you open the serial monitor, you should see the readings displayed on your screen every half a second.
int trig = 3;// declare and initialize a variable to held the pin 3 of the arduino
int echo = 2;// declare and initialize a variable to held the pin 2 of the arduino
float duration, distance;// declare two variable of type float for the time and the the distance
void setup() {
  pinMode(trig, OUTPUT);// initialize trig as an output
  pinMode(echo, INPUT);// initialize echo as an input
  Serial.begin(9600);// initialize serial communication at 9600 bits per seconds
}
void loop() {
  digitalWrite(trig, LOW);// set trig to LOW
  delayMicroseconds(2);// wait 2 microseconds
  digitalWrite(trig, HIGH);// set trig to HIGH
  delayMicroseconds(10);// wait 10 microseconds
  digitalWrite(trig, LOW);// set trig to LOW
  duration = pulseIn(echo, HIGH);// use the function pulsein to detect the time of the echo when it is in a high state
  distance = duration * 0.0343 / 2;// divide the time by 2 then multiply it by 0.0343
  Serial.print("Distance: ");// print "Distance: "
  Serial.print(distance);// print the value of distance
  Serial.println(" cm");// print " cm"
  delay(500);// wait half a seconds
}
With a Library
To download the “NewPing” library, open Arduino IDE, go to Sketch > Include Library > Manage Libraries, search for newping, and then install the one by Tim Eckel.
#include<NewPing.H>// include newping library
NewPing sonar (3, 2, 450);// create ultrasonic object with the following parameters (Trig=3, Echo=2, Max distance=400cm)
float distance;// initialize a variable of type float
void setup() {
Serial.begin (9600);// initialize serial communication at 9600 bits per second
}
void loop() {
distance = sonar.ping_cm();// putting the measured value in distance
Serial.print("Distance= ");// print "Distance"
Serial.print(distance);// print the value of the distance
Serial.println(" cm");// print "cm"
delay(500);// wait half a second
}
By utilizing the “NewPing” library, coding becomes easy, and the sensor readings will remain the same as they were without using the library.
One Wire Connection
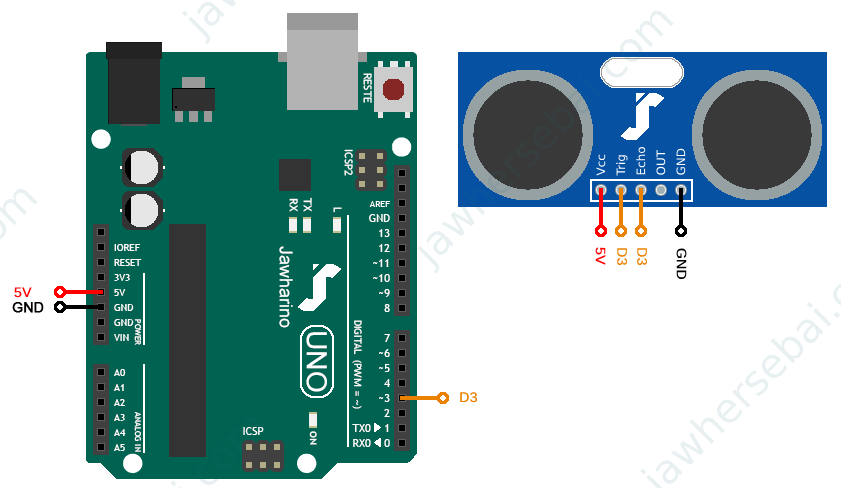
To minimize the number of wire connections, we will be using pin 3 of the Arduino for both Trig and Echo pins, and in the sketch, we are only going to set the Trig and Echo pins to pin 3 of the Arduino, and the rest is the same as before.
NewPing sonar (3, 3, 400);// create ultrasonic object with the following parameters (Trig=3, Echo=3, Max distance=400cm)
Sources
- HY-SEF05 Datasheet: micros.com.pl
