How To Use HC-SR501 PIR Sensor

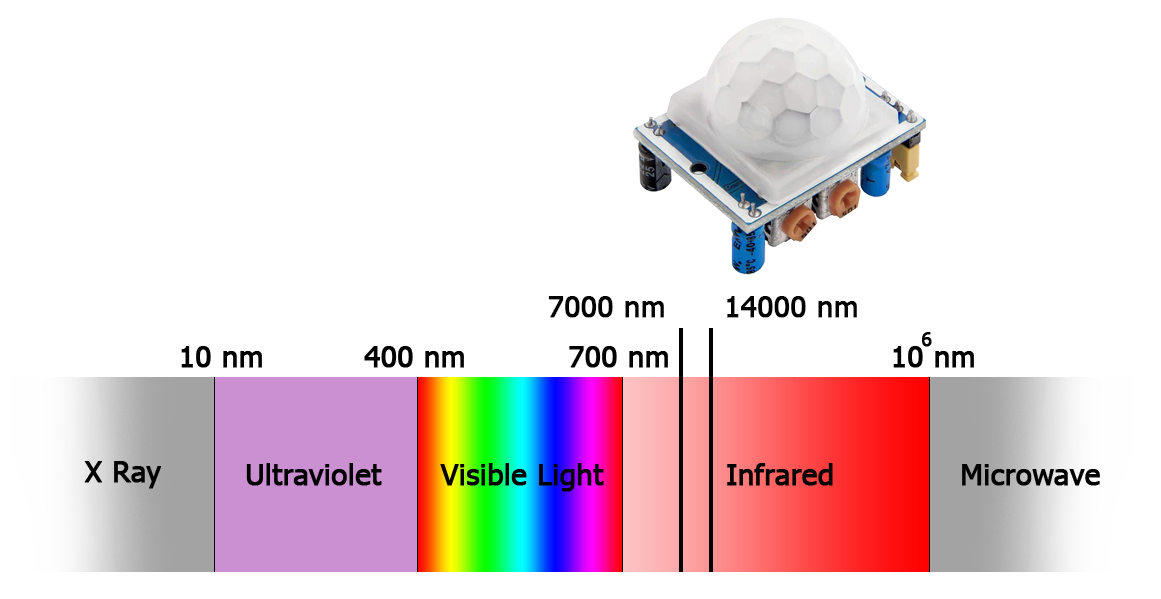
Every object with a temperature higher than -273.15 degrees emits heat energy in the form of infrared radiation, this infrared radiation is invisible to the human eyes because they have longer wavelengths than visible light, ranging from 700 nanometers to 1 000 000 nanometers. The HC-SR501 PIR is capable to see infrared radiation that vibrates between 7000 nm and 14,000 nm.
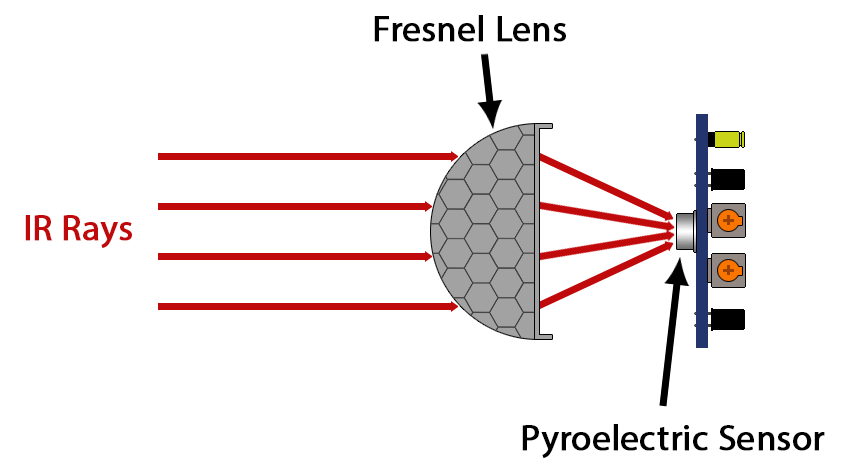
The PIR sensor is mainly composed of a pyroelectric sensor and a special lens called a fresnel lens, The lens is for focusing all the infrared radiation on one point and widens the detectable angle to 120°. The pyroelectric sensor has two pyroelectric materials inside its metal can. A pyroelectric material generates a voltage when it is heated cooled or, This material is naturally polarized and when we bring any source of heat closer to it the voltage will rise, and when we remove the heat source it will reverse its polarity and gradually the voltage will drop down to zero.
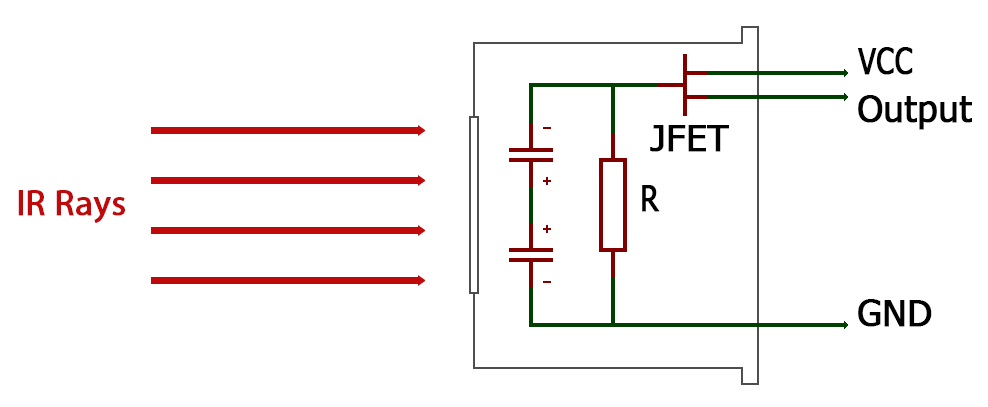
this pyroelectric sensor has two pyroelectric elements inside of its metal can, they are wired together in series and their positive or negative poles are connected facing each other. The purpose of this connection and the use of two pyroelectric elements instead of one is that we are looking for a change in infrared level to trigger an action, And also to prevent false alarms. Because this material is also a piezoelectric material which means it will generate a voltage when we apply mechanical stress to it, So the PIR sensor will not trigger any action when there is any vibration near it.
How HC-SR501 PIR Sensor Works
here is two batteries that have the same voltage and are connected in series and their positive or negative poles are connected facing each other, When we measure the voltage with a voltmeter across their terminals they will give us a 0V, And if one of them has a voltage higher o lower than the other the total voltage will be the difference between them, and that value could be negative or positive depending on which battery is higher than the other.
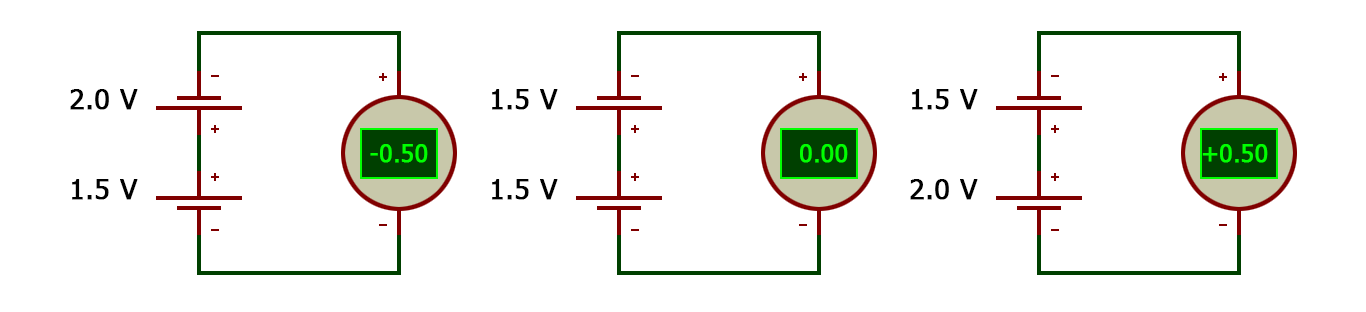
This previous example of the batteries is the same as what goes on inside the pyroelectric sensor when there is no movement detected in front of the sensor the two pyroelectric elements see the same amount of IR radiation coming from the surrounding objects as a result, they will cancel each other out and no action will happen. but when a warm body comes in front of the sensor the new amount of IR radiation will change and one of the two pyroelectric materials will receive this variation before the other one does, And that happens in parts of a second. Right now the two elements have different amounts of IR radiation and therefore the PIR sensor will trigger the OUT pin to a HIGH level.
HC-SR501 PIR Sensor Hardware Overview
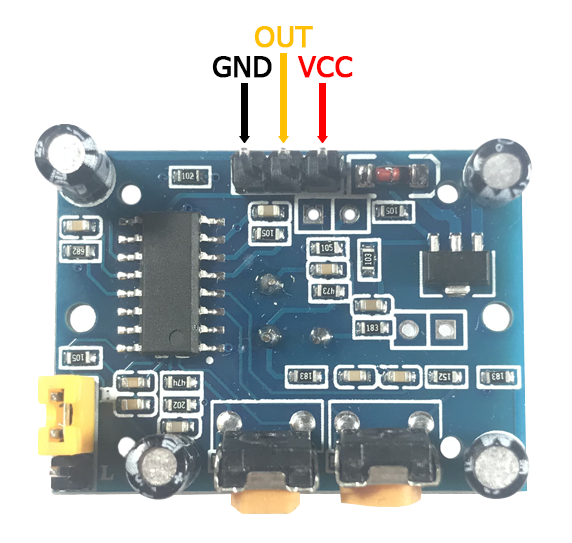
VCC and GND to power up the module with a voltage between 5V and 12V, The maximum current draw is less than 2mA, And the detectable distance starts from 3 meters to 7 meters, The OUT pin will give us 3.3V when there is motion detected and 0V when there is no motion in front of the sensor.
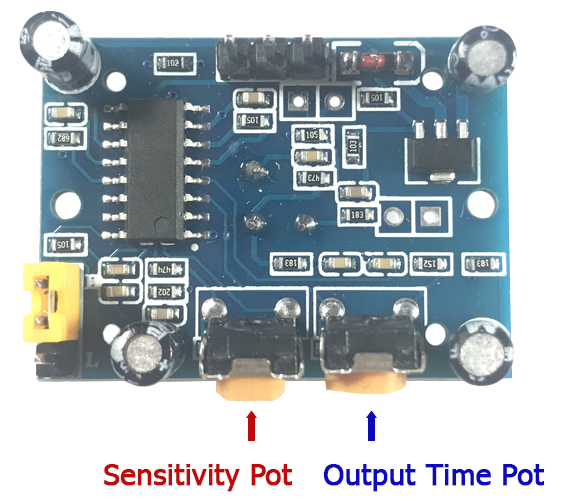
The Output Time Potentiometer is for controlling the time that the OUT pin stays HIGH. When there is a movement in front of the sensor turning this potentiometer to the left means that you set the OUT pin to stay at a HIGH level (for 3 seconds) and turning this potentiometer to the right means that you set the OUT pin to stay at a HIGH level for (5 minutes).
The Sensitivity Potentiometer is for controlling the length of the distance that the sensor cover which starts from 3 meters to 7 meters.
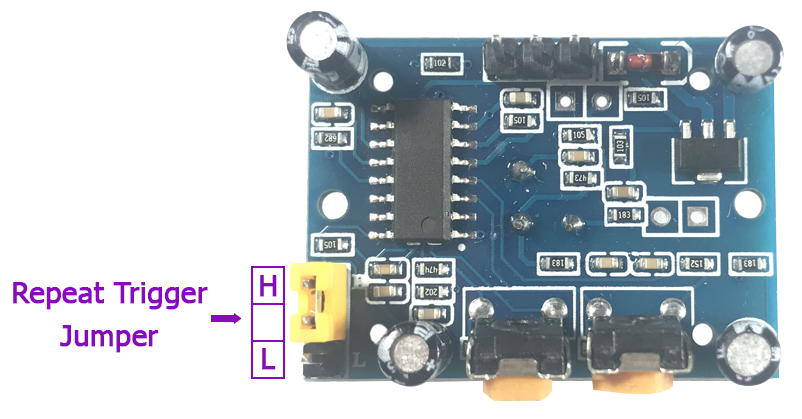
The Repeat Trigger Jumper has three pins and if we connect the middle pin with the L pin of the jumper, the sensor will work normally and if there is a movement in front of it the OUT pin will stay at a HIGH level according to the time we set with the Output Time Potentiometer.
If we connect the middle pin with the H pin of the jumper the sensor will ignore the time we set with the Output Time Potentiometer and the OUT pin will stay at a HIGH level when there is a continuous movement in front of the sensor.
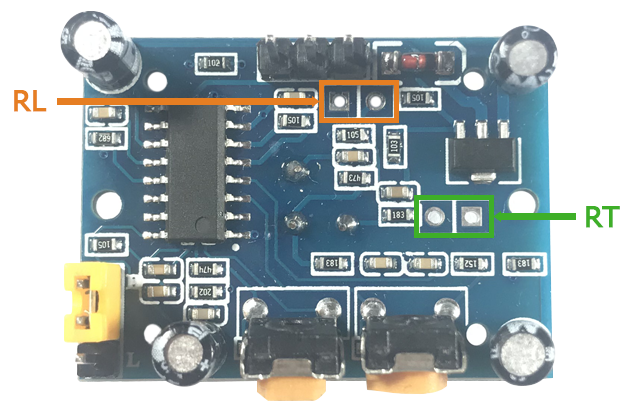
RT – This place is for connecting a thermistor that allows the PIR sensor to work perfectly at a high temperature.
RL – This place is for connecting a Light Dependent Resistor (LDR) which allows the PIR sensor to work only in the dark.
How To Use HC-SR501 PIR Sensor With Arduino
The advantage of the HC-SR501 PIR Sensor is that you can use it without any microcontroller, you only have to power it up with a voltage between 5V and 12V and connect the OUT pin to a LED or a relay if you want to control a high voltage lamp for example.
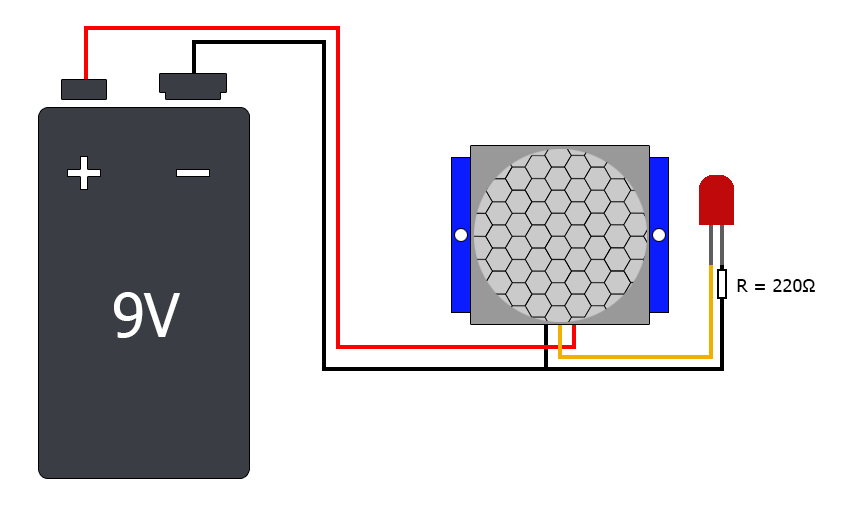
When you power up everything keep in mind that you need to leave the PIR sensor to acclimate to the room or the ambient temperature for about 30 seconds to 60 seconds. After this period has elapsed you can test passing your hand in front of the sensor and you will see that the LED will turn on. Each time the HC-SR501 PIR sensor detects a movement it will stop receiving any other movement for about 6 seconds and after this period elapse the sensor will come back to work again normally.
Wiring A PIR Sensor To An Arduino
If you would like to use the HC-SR501 PIR sensor with the Arduino this is the next schematic we will be using a 1602 LCD with it to write “Motion Detected” when there is movement and “No Motion” when there is no movement in front of the sensor.
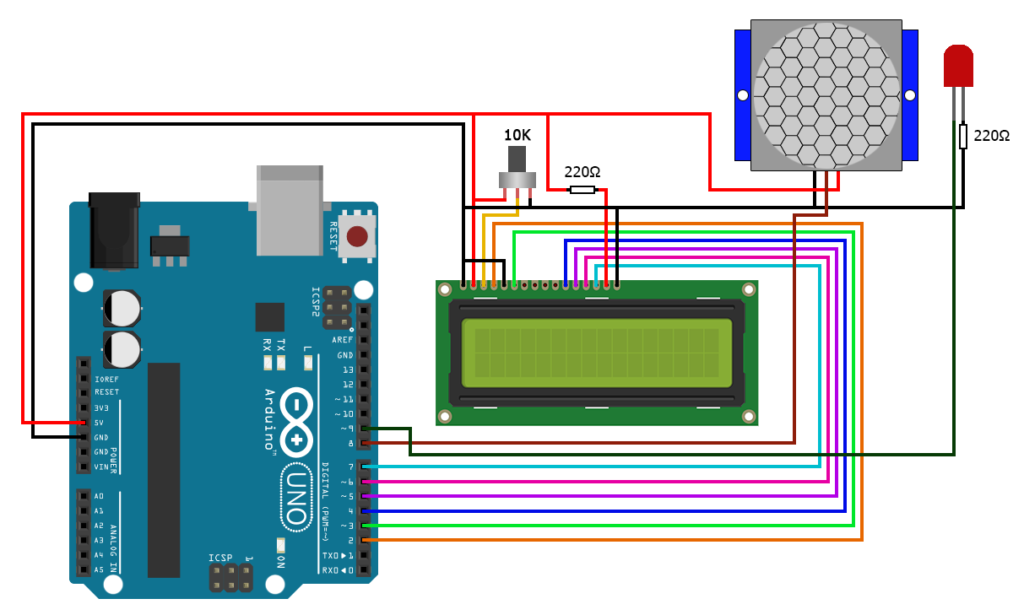
here is the code copy and paste it on your Arduino IDE. If you don’t know how to use the 1602 LCD with Arduino check out my tutorial on How LCD Works And How To Use It With Arduino
#include <LiquidCrystal.h>
const int rs = 2, en = 3, d4 = 4, d5 = 5, d6 = 6, d7 = 7;
LiquidCrystal lcd(rs, en, d4, d5, d6, d7);

int ledPin = 9;
int pirPin = 8;
int pirValue;

void setup() {
  Serial.begin(9600);
  lcd.begin(16, 2);
  pinMode(ledPin, OUTPUT);
  pinMode(pirPin, INPUT);
}

void loop() {
    pirValue = digitalRead(pirPin);
    Serial.println(pirValue);
    delay(2000);
    if (pirValue == 1){
      digitalWrite(ledPin, HIGH);
      lcd.setCursor(0, 0);
      lcd.print("Motion detected");
      delay(100);
      lcd.clear();
    }
    else{
      digitalWrite(ledPin, LOW);
      lcd.setCursor(0, 0);
      lcd.print("No Motion");
      delay(100);
      lcd.clear();
    }
}
I hope you learned something, If you have any questions write them in the comments section down below, check out my tutorial video of the HC-SR501 PIR sensor on my YouTube channel, and have a good day 